Attaching your clip-in extensions properly ensures a seamless blend with your natural hair. But that’s not the only reason – proper attachment ensures that your hair stays firmly in place and has a comfortable fit.
If the pieces are not properly clipped in, they can pull on your natural hair and cause damage.
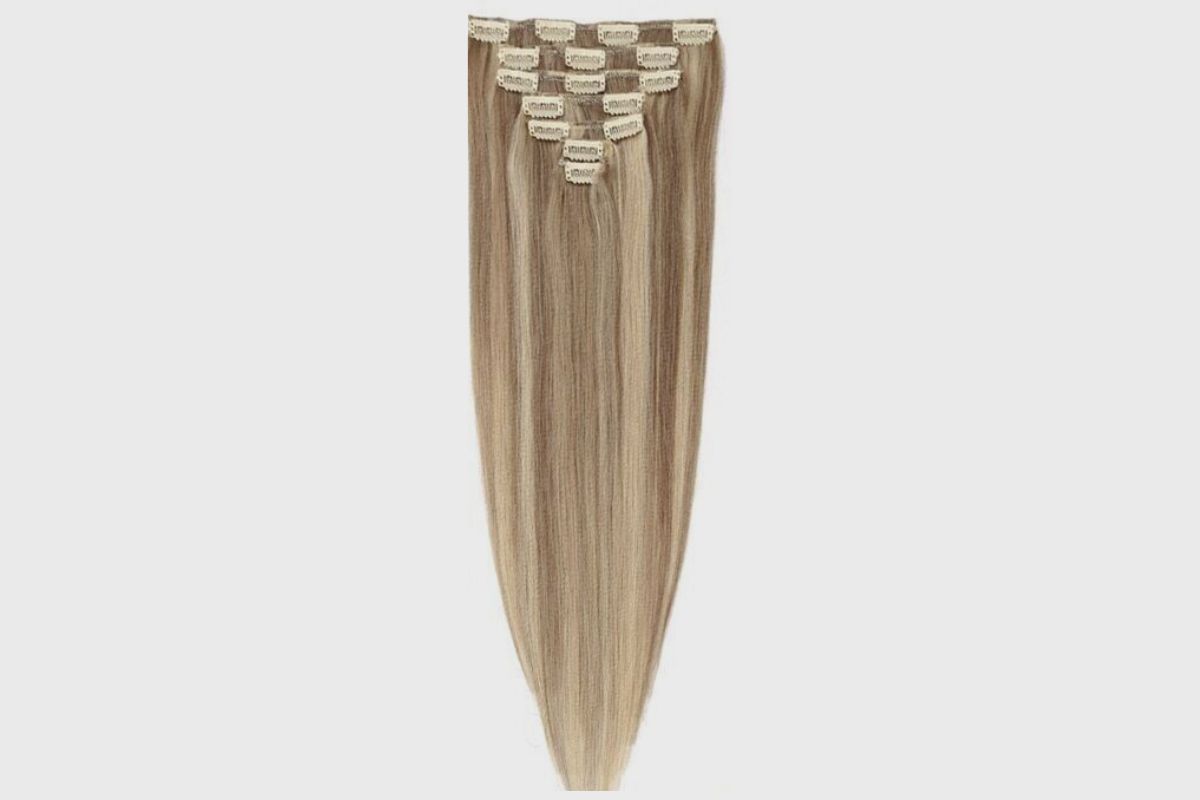
Clip-in extensions are available in different sets with varying numbers of pieces. While some come in 5-pieces, others come in 7 or 9-pieces.
You can choose the exact number of pieces based on the number of pieces you will require to achieve your desired volume and length. Note that you do not have to use all the pieces if you’ve achieved your desired look.
Related Posts to read:
Available Length Options for 7-Piece Clip-In Hair Extensions
Just as the name suggests, 7-piece clip-in extensions come with 7 pieces of clip-in wefts in varying lengths. Most 7-piece clip-in weft sets come with:
- 1 piece of 8 inches (4 clips)
- 1 piece of 7 inches (4 clips)
- 3 pieces of 6 inches (3 clips)
- 2 pieces of 4 inches (2 clips)
You must note that the specific length options for a 7-piece clip-in hair extension set may vary depending on the brand. That’s why it is best that you check with the specific brand or retailer to determine the available inch options for their 7-piece clip-in hair extensions.
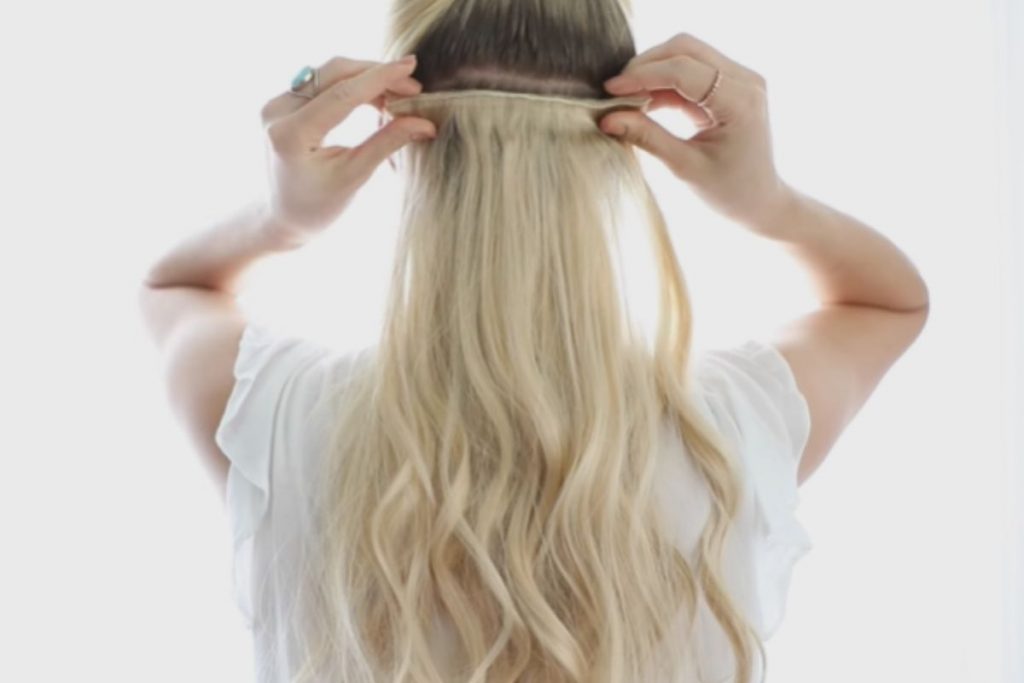
Step-by-Step Guide: Putting in 7-Piece Clip-In Hair Extensions
If you frequently wear clip-in extensions, you will know that the attaching process is entirely seamless and fast.
However, if you are new to clip-in hair extensions, the application process may seem confusing, but there’s no need to worry; just follow these steps to put in your 7-piece clip-in hair extensions easily:
- Brush your hair: With the aid of a soft brush, brush through your natural hair thoroughly to make sure it is completely free of tangles or knots.
- Section your hair: To create a clean part in your hair, use a rat-tail comb just below your ears. Pull all the hair above the comb up into a bun or use hair clips to hold the hair in place.
- Start with a 3-clip weft: Now take a 3-clip weft and brush it, then measure to make sure the size fits into your sectioned hair. Then, snap open the clips on the weft and clip to the roots of your hair. However, ensure that you don’t clip in the extensions too close to your hairline so that they blend seamlessly for a natural look.
- Take the shorter 4-clip weft: Most packs of 7-piece clip-in hair extensions come with a long and short 4-clip weft. For this step, take the shorter 4-clip weft (7 inches), and brush it to make sure it’s knot-free. Then take another section of your hair, about an inch from above the first clipped weft, and measure the weft to make sure the size fits into your sectioned hair. Now, you can clip the wefts into your roots, starting from the clips in the middle and then following in with the side clips.
- Take the longer 4-clip weft: Here, all you have to do is repeat the process using the long 4-clip weft (8 inches). Simply separate a section of your hair just an inch above the last clipped-in wefts, then measure the weft against your head to make sure it fits. Now clip in from the middle and work your way through to the side clips.
- Take the second 3-clip weft: Attach the second 3-clip weft by creating a thin section of hair above the previous weft, then place and measure the weft for a perfect fit. Brush the weft before attaching it to your head. Then find the centre of your head, and fix-in the middle clips before moving to the side clips. At this point, you’d be left with just the small wefts, as all the large wefts would have been clipped in.
- Take the 2-clip wefts: For a seamless blend with your natural hair and with the other clip-in extensions, this 2-clip weft should be attached to the sides of your hair to add volume. About 2 inches from your ear on the side, separate a straight section of hair, brush your 2-clip weft, and fix the clips to the roots closer to your hairline. Repeat this process for the other side of your ear.
- Take the 1-clip wefts: Finally, all you have to do is add your 1-clip wefts to sections of your hair that appear to be scanty, either above the 2-piece wefts or to sections that need to be blended.
- Brush your hair to ensure that all the wefts of your 7-piece clip-in hair extensions are properly hidden. Make the needed adjustments where needed.
- Now, you can style as desired.
After reading the outlined steps, you’ll find that attaching your 7-piece clip-in hair extensions is a simple process that you can do by yourself. Don’t worry if you encounter any difficulties while trying to achieve a seamless blend and natural look with your extensions. Practice makes perfect, and with enough practice, you will soon become a pro.
Conclusion
In conclusion, following the steps listed above will guide you in properly putting in your 7-piece clip-in hair extensions. This is essential for achieving a seamless blend and preventing damage to your natural hair. And in case of any issues, constant practice will help you master the process and achieve your desired look.
Image Gallery – How To Put In 7-Piece Clip-In Hair Extensions

Related Posts to Read:
- How To Apply Zala Clip-In Hair Extensions
- How To Apply Bellami Clip-In Hair Extensions
- How To Air-Dry Clip-In Hair Extensions?
- How To Clean Clip-In Hair Extensions
- How Many Clip-In Extensions Are Needed For A Full Head?
- How To Properly Install Clip-In Hair Extensions
- How To Untangle Clip-In Hair Extensions
- What Are The Thickest Clip-In Hair Extensions?
- Why Do Clip-In Hair Extensions Get Tangled?
- How Long Can You Wear Clip-In Hair Extensions?
- Do Clip-in Hair Extensions Fall Out Easily?
- How To Put In 5-Piece Clip-In Hair Extensions.
- How To Put In 6-Piece Clip-In Hair Extensions.
References:
- About Hair Extension (Link).