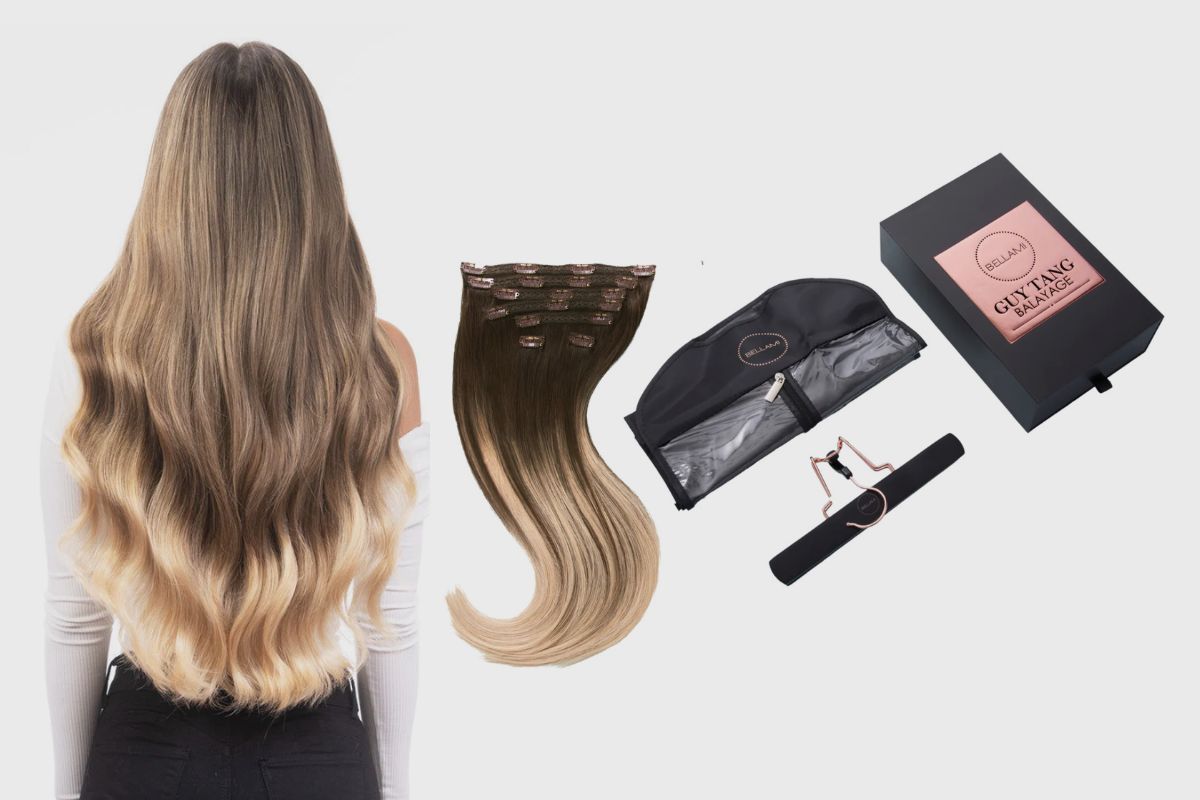
Clip-in hair extensions are the best temporary solution for adding instant volume and length to your hair. Bellami stands out from other extension brands because they uses only 100% real Remy human hair.
This type of hair is meticulously arranged from the root to the tip, resulting in superior quality that prevents matting and tangling. Since they are made with high-quality human hair, Bellami clip-in extensions require minimal maintenance.
Bellami clip-in hair extensions come in the widest range of lengths, textures, and colours that match everyone’s specifications. And the best part? With just the snap of a clip, this hair can be easily fixed in and removed. If you want to have a quick change of style for any occasion, then Bellami clip-ins are a perfect choice.
Other Brands:

WENNALIFE Hair Extensions Clip In, 18 Inch 120g 7pcs Clip in Hair Extensions Real Human Hair Balayage Dark Brown Mixed Chestnut Brown Remy Coloured Human...
Related Posts to read:
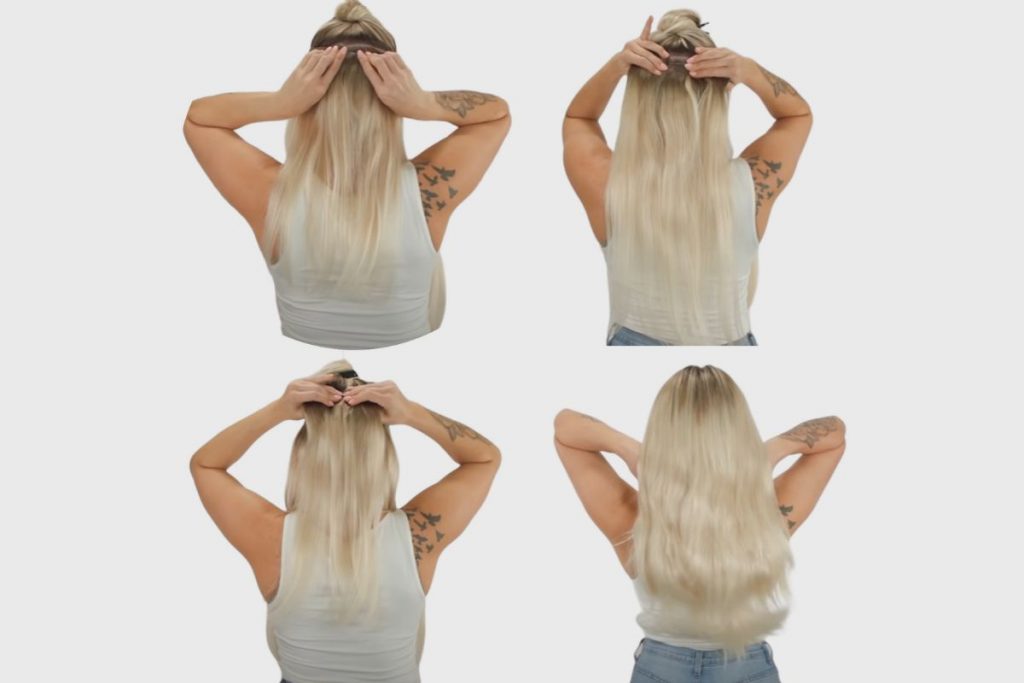
Steps to apply Bellami clip-in hair extensions
Fixing your Bellami clip-in hair extensions is a stress-free and quick process that can be completed in just a matter of minutes.
To apply your Bellami clip-in hair extensions, take the following steps:
1. Prepare your hair:
Before you start the application process, you have to brush through your natural hair to ensure that it is tangle-free.
2. Separate your hair:
To attach your clip-in extensions properly, start from the bottom of your hair and work your way up. Begin by sectioning your hair at the lowest point behind your ears using the pointed end of a rat-tail comb.
3. Section your hair:
Now, create parts where you want to section your hair with the comb and clip up your hair to keep the rest of the hair out of your way.
4. Prepare your wefts:
Take the first weft from your pack of extensions. Make sure that the first weft you take is long enough so that the weft is wide enough to sit along the back of your hairline. Then, snap open all the clips so they are ready to be inserted into your hair.
When fixing in the clips, ensure that you start by fixing in the middle clip before you work your way to the side clips.
5. Attach your first weft:
Fix in your first weft by snapping the clips open, fix into your hair, and snap the clip shut so it grips your hair firmly.
6. Create another section:
Let down the hair that you have clipped up and make a new part about an inch above the weft you have previously attached. This is where you will attach the new wefts. Then, clip the rest of the hair back up.
7. Attach the remaining wefts:
Now fix in the remaining wefts by repeating the above process. Fix in the widest wefts of your extension pack to the centre of your head, while the smaller wefts should be used for the sides and top sections of your head. Attach the side wefts so they frame your face and add volume to both sides of your head.
8. Check for gaps:
Once you have inserted all of your clip-in hair extensions, grab a mirror and carefully check your hair for any gaps that might indicate wefts that are not laying perfectly flat against your head. If any, you can easily correct them by snapping the clips open and fixing them again so they lie flat.
9. Blend with your natural hair:
After attaching all the wefts, gently comb through your hair to blend your Bellami clip-in extensions with your natural hair. You can use a hairbrush to make sure the wefts are properly hidden.
10. Style as desired:
Now, you can curl or straighten your hair to achieve your desired look.
Upon taking the above-listed steps, you will find that it takes less than 5 minutes to fix your Bellami clip-in hair extensions.
If you’re looking for an effortless way to switch up your look or boost its length and thickness but are not ready for permanent extensions, then this option is a no-brainer for you.
With these steps as a guide, you shouldn’t have any issues fixing your clip-in extensions. But just in case you do, don’t stress; you can keep removing and fixing back in till you achieve your desired result.
Conclusion
In conclusion, the steps for applying your Bellami clip-in hair extensions are simple and quick, making it a perfect temporary solution for adding volume and length to your hair.
Bellami’s use of 100% real Remy human hair ensures superior quality and minimal maintenance. By following the steps provided, you can easily apply your clip-in hair extensions to achieve a seamless blend with your natural hair.
Image Gallery – How To Apply Bellami Clip-In Hair Extensions?

Related Posts to Read:
- How To Air-Dry Clip-In Hair Extensions?
- How To Clean Clip-In Hair Extensions
- How Many Clip-In Extensions Are Needed For A Full Head?
- How To Properly Install Clip-In Hair Extensions
- How To Untangle Clip-In Hair Extensions
- What Are The Thickest Clip-In Hair Extensions?
- Why Do Clip-In Hair Extensions Get Tangled?
- How Long Can You Wear Clip-In Hair Extensions?
- Types of Hair Extensions
- What is Hair Extension?
- Do Clip-in Hair Extensions Fall Out Easily?
References:
- About Hair Extension (Link).